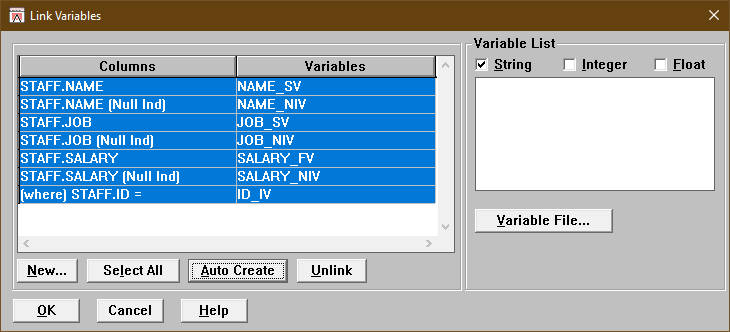
If you want DB/Assist to automatically create ESL variables of the appropriate types for one or more selected columns, select the Auto Create push button in the Link Variables dialog box.
The following table lists the default names that DB/Assist uses for each variable type when you select the Auto Create push button. In all of these names, Column represents the name of the database table column.
Default Name |
ESL Variable Type |
Column_SV |
String |
Column_IV |
Integer |
Column_FV |
Float |
Column_NIV* |
Integer |
* NIV = Null Integer Variable
Do not use the following characters in an ESL variable name:
•@ (at character)
•# (pound character)
•$ (dollar character)
If any of these characters appear in a column name, DB/Assist deletes it when creating a variable name for the Auto Create function.
You cannot use the Auto Create push button to link ESL variables to computed columns in a SQL SELECT statement.
To link ESL variables to computed columns, do either of the following:
•Use the New push button to create a new variable for the computed column, as described in Creating a New Variable.
•Link the computed column to a predefined variable contained in a variable file, as described in Linking Columns with Predefined Variables
To automatically create ESL variables of the appropriate type and link them to one or more selected columns when running DB/Assist standalone, follow these steps:
1.If you have not already done so, select SQL Statement Ø Variables or the Link variables button.
The Link Variables dialog box appears. The qualified column names in the statement appear in the Columns/Variables table.
2.Select the column or columns for which you want to create variables in either of the following ways:
•To select all columns, click the Select All push button.
•To select one or more individual columns, click on the individual column name.
3.Select the Auto Create push button.
A default ESL variable name appears next to each column that you selected, as shown below.

Link Variables Dialog Box with Auto Created Variables
If you want to change an individual variable association before closing the dialog box, select the row containing the column name and variable that you want to change. Then, select another variable to replace the previous one.
If you want to change several variable associations at once, select the rows containing the column names and variables that you want to change. Then, select the Unlink push button to clear all variables from the selected columns. Using the Unlink push button saves time when multiple rows are selected, as is the case when you use the Select All push button followed by the Auto Create push button.
4.Select the OK push button in the Iink Variables dialog box.
DB/Assist updates the SAM containing this statement with the variable associations.
In the SQL Editor window, DB/Assist replaces the parameter markers in the UpdateStaff statement with the variables you specified in the Link Variables dialog box, as follows. Notice that each variable is preceded by a colon ( : ) to indicate that it is an ESL host variable.
UPDATE DB2ADMIN.STAFF
SET ID = :ID_IV, NAME = :NAME_SV, DEPT = :DEPT_IV, JOB = :JOB_SV, YEARS = :YEARS_IV, SALARY = :SALARY_FV, COMM = :COMM_FV
WHERE DB2ADMIN.STAFF.ID = :ID_IV
If necessary, you can select Options Ø Word wrap to format the text in the SQL editor window so the entire statement is visible.