To create a new SQL statement in DB/Assist, you must complete the New SQL Statement dialog box to specify the following for each statement:
•Name (required)
•Type (required)
•Description (optional)
Statement Name
You must assign a name to every SQL statement that you create in DB/Assist. This name must be unique among all statements in the current SAM
When you compile the SAM, the statement name appears after the OPEN_, FETCH_, CLOSE_, or EXECUTE_ prefix in the name of generated ESL action routines, unless you specify otherwise.
In order to assign meaningful statement names, it may be useful to include the type of statement within the name. This allows you to quickly determine each statement's type when looking at a list of statement names.
For example, you might assign the name SelectStaff to a SELECT statement that retrieves information from a table called Staff.
In addition to assigning a statement name, you must also specify the statement type.
Select one of the types listed in the New SQL Statement dialog box, as described in the following table.
Build a SELECT statement that retrieves multiple rows of data and generates cursor-based ESL action routines when you compile the SAM
Build a SELECT statement that retrieves a single row of data
Build an UPDATE statement that updates one or more rows of data.
Build an UPDATE statement that uses the WHERE CURRENT OF clause to update a singe row of data pointed to by the current cursor position.
Build a DELETE statement that removes one or more rows of data
Build a DELETE statement that uses the WHERE CURRENT OF clause to remove the row pointed to by the current cursor position.
INSERT Build an INSERT statement that inserts one row of data.
Other Build any type of SQL statement other than SELECT, UPDATE, DELETE, or INSERT. (For a list of the Other type statements that DB/Assist supports, see Building an Other Type Statement.)
When creating a SQL statement, you can specify an optional description of the statement that appears as a comment in the ESL code that DB/Assist generates.
It may be useful to supply a description as a means of identifying the function of the statement or the tables on which it operates.
To create a new SQL statement in DB/Assist, follow these steps:
1.Make sure that you have already created a new SAM to contain this statement, or have opened an existing SAM
If you need information about creating a new SAM, see Creating a New SAM. For information about opening an existing SAM, see Section Opening an Existing SAM.
2.Select SQL Statement Ø New or the New Statement button. The New SQL Statement dialog box appears.
3.Type a unique name for the SQL statement in the Statement Name entry field.
4.Check the radio button or buttons in the Statement Type group box that represent the type of SQL statement you want to create.
If you check SELECT, UPDATE, or DELETE, make sure you also check the form of the statement that you want to create. (For more information about the types of SQL statements that DB/Assist supports, see the Statement Type table.)
5.If desired, type a description of the SQL statement in the Description field.
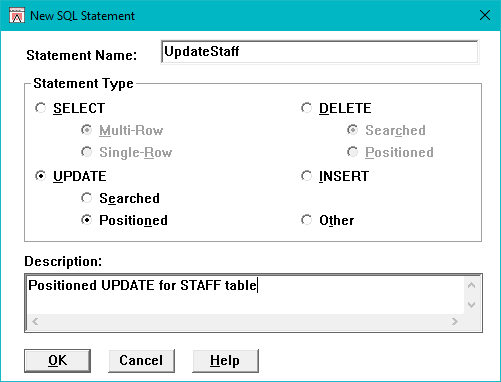
For example, below shows an example of a completed New SQL Statement dialog box that creates a positioned UPDATE statement named UpdateStaff.

Completed New SQL Statement Dialog Box
6. Select the OK push button to add the SQL statement to the current SAM.
The dialog box closes, and the statement name appears in the Statement drop-down list on the SQL Statement button bar. The statement type appears in the field to the immediate right of the Statement drop-down list.
The following shows the Statement drop-down list and type field for the UpdateStaff statement.

Statement Drop-Down List and Type Field
If you do not specify a name that is unique among all statements in the current SAM, a message box appears informing you that the name already exists and instructing you to rename the statement.
If you do not specify a statement type, a message box appears instructing you to select a type.
To close the New SQL Statement dialog box without creating a SQL statement, select the Cancel push button.